In the quickly changing world of solar energy today, having remote access to your solar system for monitoring and management is a great advantage. Connecting your Growatt solar inverter to your WiFi network is a crucial step in this process. By doing this, you may monitor the functioning of your system, access real-time statistics, and make changes from the comfort of your computer or smartphone. This post will walk you through the easy method of connect growatt solar inverter to WiFi.
An integrated solar inverter has several advantages. You can monitor your energy output closely, identify and address problems quickly, and even help the environment by managing your energy use. Additionally, having an online inverter lets you get firmware upgrades automatically, keeping your system current and functioning properly.
To ensure that you can fully utilize your solar energy system, we will take you step-by-step through the process of connecting your Growatt solar inverter to your WiFi network in this extensive tutorial.
Readiness and Necessities
Prior to starting the process of linking your Growatt solar inverter to WiFi, there are a few crucial steps and requirements you need to know about:
• Verify that the Growatt solar inverter is active and correctly installed.
• Prepare your WiFi network credentials, which include your password and SSID (WiFi network name).
• Have your laptop, tablet, or smartphone close at hand for the setup procedure.
Let’s now explore the detailed instructions for setting up your Growatt solar inverter to connect to WiFi.
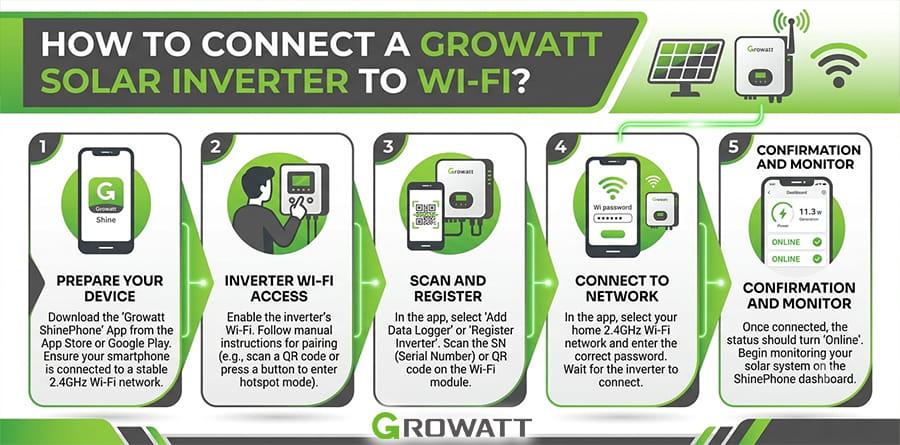
A Step-by-Step Guide for Setting Up Your Growatt Solar Inverter to Connect to WiFi
Step 1: Navigating the User Interface of the Inverter
You must first log into your Growatt solar inverter’s user interface to start the procedure. To do this, take the following actions:
1. Find the Growatt solar inverter location. Usually, it is placed in a handy spot for maintenance or next to your solar panels.
2. Launch one of the web browsers, such as Chrome, Firefox, or Safari, on a PC or mobile device.
3. Type your inverter’s IP address into the address bar of your browser. The majority of Growatt inverters have 172.16.0.1 as their default IP address.
4. Hit “Enter,” and the user interface login screen for your inverter should appear.
Step 2: Accessing the WiFi Configuration
Once the user interface is open, use these instructions to find the WiFi settings:
1. Enter your password and username to log in. The default login credentials are usually “admin” for both username and password if you haven’t changed them.
2. Locate the “Settings” or “Configuration” menu in the user interface. Depending on the type of your inverter, the precise placement may change; however, it is often located in the main menu.
3. There should be a “Wi-Fi” or “Network Settings” option under the “Settings” or “Configuration” menu. To view the Wi-Fi setup page, click on it.
Step 3: Establishing a WiFi Network Connection
You may now link your Growatt solar inverter to your WiFi network because you’re on the WiFi setup page.
1. “Scan” for accessible Wi-Fi networks is an option on the Wi-Fi settings page. When you select this option, the inverter will look for networks in the area.
2. Following the completion of the scan, a list of accessible Wi-Fi networks will appear. From the list, choose your Wi-Fi network (SSID).
3. Type your WiFi password into the space provided. Due to case sensitivity, make sure you input it correctly for WiFi passwords.
4. Depending on the type of your inverter, click “Connect” or “Save” after entering the password.
Step 4: Verifying the Relationship
Following a click on “Connect” or “Save,” your Growatt solar inverter will try to connect to your WiFi network. This might take a minute or two to complete.
Your inverter should now be linked to your WiFi network, according to a confirmation message that appears once the connection is properly made. This indicates that your solar system is operational and prepared for remote monitoring and control.
Tips for Troubleshooting
Here are some troubleshooting ideas to assist you in case you run into any problems throughout the setup process:
-
Verify that you entered your WiFi network credentials accurately by checking them twice.
-
Verify that the signal from your WiFi network reaches your inverter.
-
If the inverter and WiFi router are not connected, try restarting both of them.
-
If the issue continues, look for the user handbook for the inverter model you own from Growatt or get help from their customer service.
If you want to know How to read growatt solar inverter meter click on it.
The Advantages of Using WiFi to Connect Your Growatt Solar Inverter
After successfully connecting your Growatt solar inverter to your WiFi network, you can begin to make use of the advantages of remote control and monitoring. The following are some benefits of having an online solar inverter:
• Real-Time Monitoring: You may monitor the operation, output of electricity, and general health of your solar system in real-time. You may use this information to make well-informed decisions regarding system upkeep and energy usage.
• Automatic Firmware upgrades: As long as your inverter is connected, you’ll get automatic firmware upgrades that keep your system running smoothly and current.
• Remote troubleshooting: You can maximize energy generation and minimize downtime by quickly identifying and resolving any issues that may develop.
• Environmental Impact: You may help produce electricity in a way that is more ecologically friendly and sustainable by maximizing the effectiveness of your solar system.
• Convenience: You have more control and peace of mind since you can view your solar statistics from any location with an internet connection.
Ask Us Frequently (FAQs)

The following are some frequent queries about setting up a Growatt solar inverter to connect to WiFi:
Q1: Can I use a smartphone app to link my Growatt solar inverter to WiFi?
A: It’s true that you can connect to certain Growatt inverters using a smartphone app. To find out if this option is available for your particular inverter model, check the documentation.
Q2: What happens if I lose track of my inverter’s IP address or login information?
A: The user handbook for your inverter has the IP address. You can obtain help from Growatt support or refer to the handbook if you can’t remember your login information.
Q3: Is constant WiFi connectivity required for my inverter?
A: a constant WiFi connection is not required, although it does enable remote control and real-time monitoring. But even without a WiFi connection, your inverter will continue to function.
Q4: Can I connect multiple Growatt inverters to the same WiFi network?
A: Yes, you can connect multiple inverters to the same network by following the same steps for each inverter.
Q5: Is it possible to change my WiFi network or password later on?
A: Yes, you can update your WiFi network or password settings through your inverter’s user interface whenever necessary.
Conclusion
Connecting your Growatt solar inverter to WiFi is a straightforward process that brings numerous benefits. It empowers you to monitor your solar system’s performance, receive automatic updates, and contribute to a greener future. By following our step-by-step guide and keeping the troubleshooting tips in mind, you can make the most of your solar investment while reducing your environmental footprint. Enjoy the convenience of remote control and the satisfaction of clean energy production.


One thought on “How to connect growatt solar inverter to wifi?”
Informative and straight forward instructions