To ensure proper and safe operation of the Gravat inverter, several steps must be taken. Keep in mind that specific procedures may vary based on the brand and version of your inverter, so refer to the user guide provided by Growatt for your model. Next, we will discuss the general review of growatt inverter set up.
Growatt inverter configuration in 9 steps
1. Precautions for Safety:
- To avoid electrical mishaps, make sure you’ve shut off the AC and DC disconnect switches before you begin.
- Wear adequate safety equipment, including gloves and safety glasses.
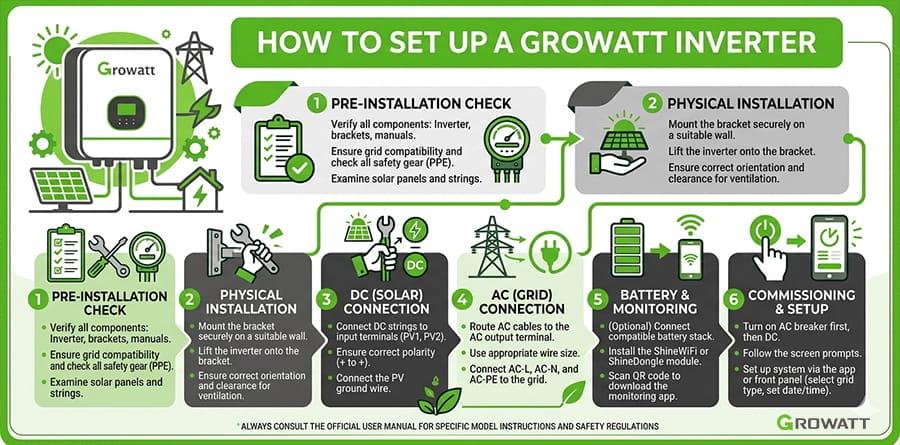
2. Mounting:
- Place the inverter somewhere safe, well-ventilated, and dry. Direct sunshine, wetness, and severe temperatures should all be avoided.
- For correct installation and clearance distances, follow the manufacturer’s instructions.
3. Electrical Hookups:
- Connect the DC input terminals on the inverter to the DC input terminals on your solar panels. For many strings of solar panels, there will often be two sets of positive and negative terminals.
- Connect the inverter’s alternating current output to your home’s electrical distribution panel or grid connection point. Follow local electrical codes and ensure correct wiring.
- To avoid short circuits, tighten all connections tightly and double-check the polarity.
4. Grounding:
Ground the inverter properly in accordance with local electrical rules. Connecting a grounding conductor to a grounding rod or other suitable grounding locations may be required.
5. Communication and monitoring:
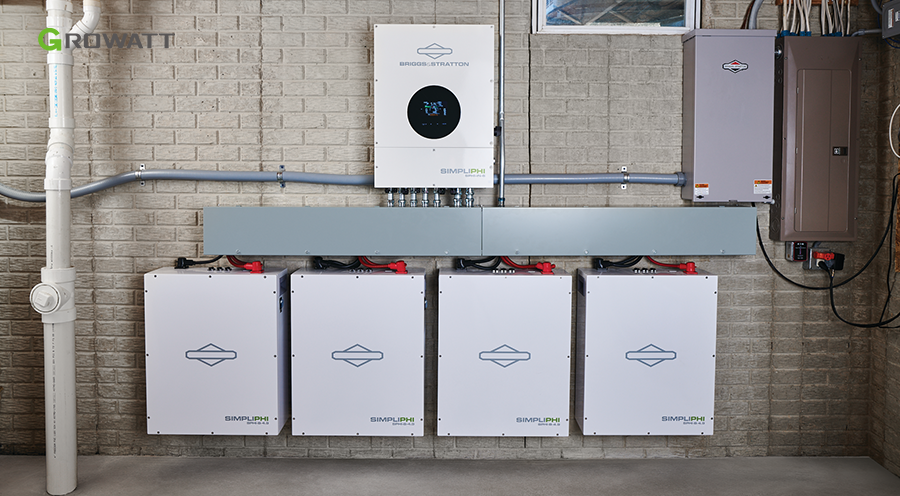
Some Growatt inverters provide monitoring and communication features. If applicable, connect the inverter to a monitoring system or Wi-Fi network. This allows you to monitor the performance remotely.
6. Configuration:
- Access the inverter’s user interface through a display screen or a mobile app (if available for your model).
- To customize the inverter parameters, including grid voltage and frequency, refer to the user handbook.
7. Testing:
- Turn on the DC disconnect switch first, followed by the AC disconnect switch, once the setup is complete.
- Examine the status lights and display of the inverter for any error messages or warnings.
- Check the inverter’s functioning to verify it’s producing enough energy.
8. Maintenance:
- Periodically check the inverter for dust or debris accumulation and clean it as needed.
- Keep an eye on its performance and log any unusual behavior or error messages.
- Perform routine maintenance as specified in the user manual.
9. Safety Checks:
- Periodically inspect the wiring and connections to ensure they are secure and in good condition.
- If you experience any issues or suspect a problem with the inverter, consult the user manual or contact Growatt customer support.
When installing a Growatt inverter, always observe all safety precautions and local electrical requirements. If you are not comfortable with the installation procedure, it is better to engage a skilled and certified electrician or solar technician. In addition, for additional instructions and troubleshooting information, see the user manual for your inverter type.