Many homeowners and even some well-meaning installers fall into traps that lead to Mistakes in Solar Inverter Installation. These solar inverter installation errors can range from annoying system shutdowns and poor performance to serious safety hazards like electrical fires. This article will walk you through the most frequent common inverter wiring mistakes, ensuring you have the knowledge to guarantee a safe, efficient, and long-lasting solar setup.
By the end, you’ll be equipped to spot inverter wiring problems before they start and avoid critical solar inverter setup mistakes that could cost you time and money.
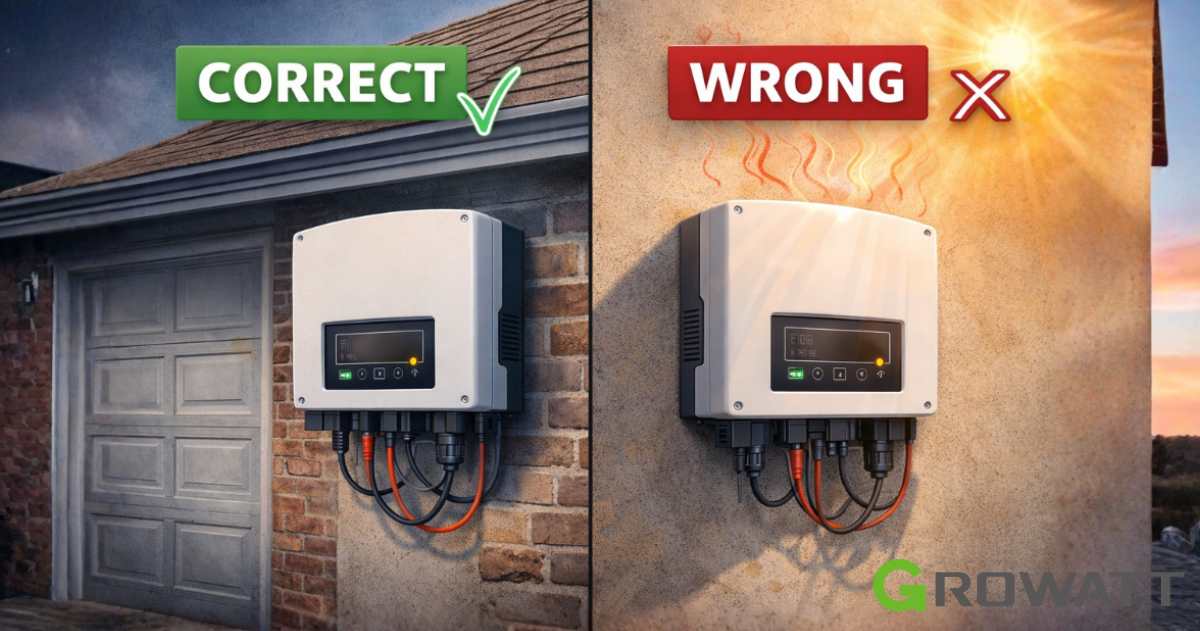
The “Where” Matters: Location is an important factor
You wouldn’t put a fish tank on a radiator, so why would you install a sophisticated electronic device in a place that’s designed to work against it? One of the most frequent solar inverter setup mistakes is choosing the wrong location. It might seem like a minor detail, but it’s a primary cause of efficiency loss and early equipment failure.
The biggest no-no? Installing the inverter where it gets hit by direct sunlight for most of the day. Inverters generate their own heat while working, and if you add summer sun on top of that, the internal temperature ascends. When an inverter gets too hot, it doesn’t just break immediately; it “derates,” which means it throttles back its power output to protect itself. Your system essentially goes into survival mode, and you lose valuable energy production exactly when the sun is shining brightest.
To avoid this:
Always look for a spot that’s shaded, cool, and well-ventilated. The ideal place is often an exterior wall of a garage, a carport, or a utility room, as long as it’s not cramped. You need to respect the manufacturer’s clearance guidelines—usually at least 30 cm (or about a foot) of space on all sides for air to circulate freely. And never, ever install it in a confined, unventilated space like a tiny cabinet, as this is a guaranteed invitation for overheating and system failure.
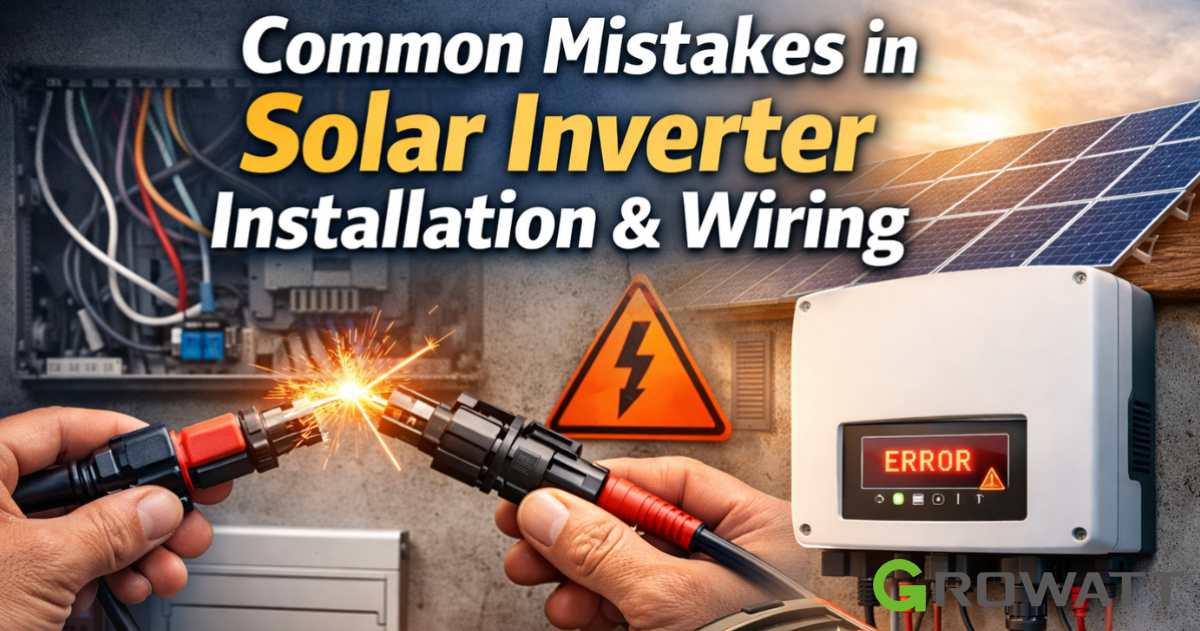
Wiring problems: It’s More Than Just Connecting the Dots
If location is the first challenge, wiring is the entire obstacle course. This is where the majority of technical inverter wiring problems crop up, and they can be the most frustrating to diagnose. It’s not just about making a connection; it’s about making the right connection, securely.
One of the trickiest issues we see involves communication wiring. Modern solar systems are smart—the inverter talks to the panels, the battery, and a monitoring portal. If that communication line is faulty, your system will face problems.
For instance, if the RS-485 communication wires are connected to the wrong terminals, your system might start up fine but then shut down with an error code like E6 . This happens because the indoor and outdoor units lose their connection. It’s a classic case of a tiny wiring mix-up causing a total system failure, often mistaken for a broken circuit board when it’s just a wire in the wrong place.
Another critical mistake is “cross-mating” DC connectors. This happens when an installer uses a connector from one brand with a connector from another because they look the same. They might fit together, but they aren’t designed to seal properly or handle the electrical load. This can lead to something called “DC arcing,” where electricity jumps across a gap, creating intense heat and posing a serious fire risk. It’s so serious that if an inverter is damaged this way, your warranty or insurance claim could be denied.
To avoid this:
Always, always follow the wiring diagram in the manual—don’t just wire by color. For DC connections, only use the spare connectors provided by the inverter manufacturer to ensure a perfect, safe fit. Furthermore, be mindful of how you route your cables. Letting them hang loose or run through sharp-edged roof tiles can chafe the insulation, leading to short circuits and inverter failure down the line.
The Devil in the Details: Grounding, SPDs, and Torque
Beyond the big-picture stuff, the difference between a system that lasts 5 years and one that lasts 20 often comes down to the small stuff. on grid solar inverter installation errors often hide in the details that are easy to overlook.
Grounding, for example, isn’t the most exciting topic, but it’s non-negotiable. Proper grounding protects your entire system—and your family—from electric shocks and power surges. A lack of proper grounding or surge protection devices (SPDs) leaves your expensive inverter vulnerable to lightning strikes or voltage spikes from the grid.
Similarly, not paying attention to “string sizing” is a common mistake. Your solar panels are connected in series to form a “string,” and that string has a specific voltage. If the voltage is too high for your inverter, it can fry the components instantly. If it’s too low, the inverter might not even turn on. Installers need to account for temperature, too, because cold weather actually increases panel voltage, which can push an already borderline system over the edge.
Common mistakes and their soloutions
| Mistake | Problem | Fix |
| Poor Placement | Overheating, efficiency loss, shutdown | Install in shaded, ventilated spot; follow clearance guidelines |
| Faulty Wiring | Communication errors, DC arcing, fire risk | Follow wiring diagrams; use manufacturer connectors only |
| Lack of Protection | Vulnerable to shocks, lightning, voltage spikes | Proper grounding; install surge protection devices (SPDs) |
| Incorrect Specs | Inverter won’t start or runs inefficiently | Check string voltage and temperature limits |
| Loose Connections | Heat buildup, potential failure or fire | Use torque tools; perform final QA check |
The Golden Rule: The Installation Manual is Your Best Friend
If you take away only one thing from this guide, let it be this: read the installation manual. It sounds almost too simple, but experts agree that a huge percentage of common inverter wiring mistakes and faults happen because someone didn’t bother to read the instructions.
Every reputable manufacturer provides a detailed manual, often available online, that tells you everything—the exact cable width you need, the angle the inverter should be mounted, the distance required from other objects, and the specific torque settings for every terminal. Treat this document not as an optional booklet, but as the blueprint for your energy independence.
By taking the time to understand these potential Mistakes in Solar Inverter Installation, you’re not just protecting a piece of equipment; you’re protecting your investment and ensuring that your home runs smoothly on clean, quiet solar power for decades to come. A little extra care during installation means a lot less stress and a lot more sunshine-powered living down the road.
Ready for a Worry-Free Solar Experience?
Don’t let installation errors dim your solar savings. Whether you’re planning a new system or concerned about an existing setup, our team of certified professionals is here to help. We follow best practices, adhere to all safety codes, and ensure every connection is perfect—so you can enjoy maximum efficiency and peace of mind.
Contact Us Today for a Free Consultation!
Stay connected with us on social media for more tips, guides, and updates on maximizing your solar investment!